What is Ansible?
Ansible is a configuration management tool, the project owned by RedHat but was originally developed by Michael deHaan.
It is an open-source software provisioning, configuration management, and application-deployment tool enabling infrastructure as code. It runs on many Unix-like systems and can configure both Unix-like systems as well as Microsoft Windows. In today’s modern world Organizations are always looking to automate repetitive things or speed up large-scale deployments. There are many other tools to automate deployments like Puppet, Salt, Terraform, etc. but Ansible is quite handy and quite easy to set up.
The node where you install ansible and run your playbooks (more on this later) is called an Ansible Controller. You only need to install Ansible on one box which will be used to manage remote nodes. Ansible does not have long-running services and the controller could be a desktop system. Ansible is a set of command-line tool executed from the controller. There is no agent software that needs to be installed on the managed nodes.
Let us start by quickly going through how we can install Ansible on different flavors of Linux.
RHEL 8:
On RHEL 8, enable the official Red Hat repository, for the corresponding Ansible version that you want to install as shown in this article. DO NOT USE PIP ON RHEL 8!.
- sudo dnf update
- sudo dnf install python3
- sudo subscription-manager repos –enable ansible-2.9-for-rhel-8-x86_64-rpms
- sudo yum install -y ansible
CentOS:
For CentOS 8, ansible was traditionally distributed via EPEL repository, but there’s no official package yet, but it is being worked on.
- sudo yum install -y epel-release
- sudo yum install -y ansible
Ubuntu:
To install the latest version of Ansible in Ubuntu we can add the Ansible PPA (Personal Package Archive). The standard Ubuntu repositories usually have Ansible, but an early version but in 20.04 it is version 2.9 so this is quite usable. If we need to prompt for passwords we will also need to install sshpass. This is installed automatically on CentOS and RHEL
- sudo apt install -y ansible sshpass
Check the version on these boxes:
ash@ash-ubuntu:~$ ansible –version
ansible 2.10.8
config file = /home/ash/.ansible.cfg
configured module search path = [‘/home/ash/.ansible/plugins/modules’, ‘/usr/share/ansible/plugins/modules’]
ansible python module location = /usr/lib/python3/dist-packages/ansible
executable location = /usr/bin/ansible
python version = 3.9.7 (default, Sep 10 2021, 14:59:43) [GCC 11.2.0]
ash@ash-ubuntu:~$
ash@ash-ubuntu:~$
ash@ash-ubuntu:~$
As a simple test without any configuration, we can connect to the localhost only. Using the ping module in Ansible we can check that we are receiving a response from the Python interpreter:
[ash@rhel8 ~]$ ansible localhost -m ping
localhost | SUCCESS => {
“changed”: false,
“ping”: “pong”
}
Create a ~/.ansible.cfg file in your home directory. Ansible looks for a “ansible.cfg” first in this order: env Variable ANSIBLE_CONFIG, $CWD/ansible.cfg, $HOME/.ansible.cfg, /etc/ansible/ansible.cfg
Our ~/.ansible.cfg will look like this: [use nano or vi to create this file]
[defaults]
inventory = inventory
remote_user = ash
The Ansible inventory is a list of Ansible nodes that we manage from the Ansible controller. This inventory can be saved in an INI, YAML or JSON format. Below is my inventory file with a mix of RHEL, CentOS, and Ubuntu machines. My Ubuntu machine is configured as Controller.
127.0.0.1
192.168.0.52
192.168.0.68
192.168.0.72
[ubuntu]
127.0.0.1
192.168.0.72
[centos]
192.168.0.52
192.168.0.68
[linux:children]
ubuntu
centos
In the above file, you may have noticed that I have grouped my machines as per type. This is not mandatory and you can just add IP addresses of your managed nodes and they will go in default all:ungrouped. Making groups help when you want to target a particular set of machines using playbooks.
You can check your inventory by using the command in below snippet:

Ad-Hoc Commands:
Ad-hoc commands allow for quick configuration without the need of Playbooks. The construction os a command is shown below.
ansible target options -m module -a arguments
$ ansible all -km debug -a ‘msg=”{{ ansible_connection }}”‘
$ ansible linux -a “cat /etc/os-release” [*linux is my group in cfg file]
$ ansible linux -a “reboot”
$ ansible all -km command -a ‘whoami’
Controller USER:
You may want a standard account that is on your controller to existing on all your managed nodes. If you remember we have set ‘remote_account’ in our ‘ansible.cfg’ file. To create same user across all nodes you may simply use the following command:
$ ansible all -k -m user -a “name=ash state=present”
SSH password:
…
We had to add root password above to get access to all nodes to create this user. Ideally we would like to authenticate with SSH keys. First step will be to create local SSH keys and then copy across all nodes.
ash@ash-ubuntu:~$ ansible 127.0.0.1  -m user -a "name=$USER generate_ssh_key=true"
127.0.0.1 | CHANGED => {
    "ansible_facts": {
        "discovered_interpreter_python": "/usr/bin/python3"
    },
    "append": false,
    "changed": true,
    "comment": "",
    "group": 1000,
    "home": "/home/ash",
    "move_home": false,
    "name": "ash",
    "shell": "/bin/bash",
    "ssh_fingerprint": "3072 SHA256:vYZyAc ansible-generated on ash-ubuntu (RSA)",
    "ssh_key_file": "/home/ash/.ssh/id_rsa",
    "ssh_public_key": "ssh-rsa AAAAB3NzaC1yc2EAAAADAQABAAABgQDEMrRnwHwIWcjOnG5sc7F0g8LfMRvHFjM= ansible-generated on ash-ubuntu",
    "state": "present",
    "uid": 1000
}
Now copy it across all nodes and add the path to CFG file:
ash@ash-ubuntu:~$ ansible all -km authorized_key -a "user=ash state=present manage_dir=true key={{ lookup('file', '/home/ash/.ssh/id_rsa.pub') }}"

$ sed -i '/\[defaults\]/a private_key_file = ~/.ssh/id_rsa' ~/.ansible.cfg
This remote user ‘ash’ will need elevated privileges to execute sudo commands. You may add this user in the correct management groups such as WHEEL or SUDO.
To ensure they can elevate correctly we will add a sudoers file for the account. Using the option -K we can add the elevation password if required.
$ ansible all -Kbm copy -a “dest=’/etc/sudoers.d/ash’ content=’ash ALL=(root) NOPASSWD: ALL’ validate=’visudo -cf %s'”
BECOME password:
NOTE: Make sure that the content is correct, as an incorrect entry can cause a failure of sudo
Common Command Options:
-b Become
-m Module-k Prompt for SSH password
-K Prompt for elevation password
-a Module arguments
-C Check, don't perform operation
-B The background timeout for async tasks
-P The poll interval to check background tasks
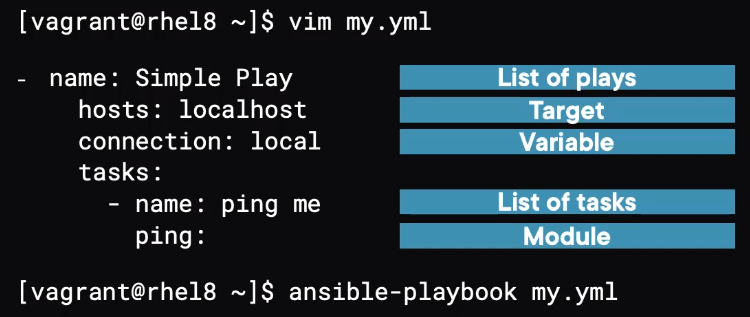
Playbooks:
To create repeatable configurations in Ansible we use Playbooks. Playbooks are written in YAML and are executed using the ansible-playbook command. YAML is white-space sensitive like Python. You can use Visual Studio Code with YAML plugin to make sure your code is checked for syntax.
A playbook can be a combination of one or more Plays. Each Play can have a Target host, variables and Tasks. Each Task then can have a module. You can have several different modules under one Task or several Tasks under one Play or several Plays in one YAML file. You run a playbook by using command ‘ansible-playbook’
Below is a sample YAML file that will give you the OS family of all managed nodes:
- name: Play OS
  hosts: all
  tasks:
    - name: task 1
      debug:
        msg: The OS is based on {{ ansible_os_family }}
Hope this has given you some idea of how Ansible is set up and how it can help in automation and configuration management. In coming days I will dive in as how we can utilize Ansible to manage and automate Azure Cloud resources.
